プラグインのメインオプション タブには、プラグインの動作に関する基本的なデフォルト設定が含まれています。メインオプションの最初の項目は管理のためのオプションで、それが4 つの項目に分かれています :
管理オプションの次の項目では、プラグインで管理するカスタム投稿タイプを選択します。
原文を見る
The plugin’s main options tab contains the basic default settings for the operation of the plugin. The first section of the main options is Manage Options and it is divided into four sections:
- Content
- New Feature Settings
- Other Settings
- Pages
- Stylesheet
The second section after Manage Options is for selecting any Custom Post Types to be managed by the plugin.
コンテンツ
この項目ではコンテンツの制限設定とその表示方法について設定します。ここにはこのプラグインで制御設定するカスタム投稿タイプが表示されています。既定では投稿と固定ページが表示されているでしょう。 ですがカスタム投稿タイプの項目でいずれかのタイプを指定した場合はそれがここに追加されます。

(全てのカスタム投稿タイプが同じように機能する訳ではなく、またそれらは普通の投稿と全く同じように動作する訳でもないということに注意してください。いくつかのカスタム投稿タイプはオプションタブの標準の WP-Members 設定だけで正常に機能するかもしれませんが、カスタム投稿タイプによっては特別な設定が必要な場合もあります。)
原文を見る
This section handles content blocking settings and how that will be displayed. There will be a setting for each post type that the plugin is set to handle. By default, this will be Posts and Pages. However, if custom post types are identified in the Custom Post Types section, those will be added here.
(Keep in mind that not all CPTs function the same, and not all of them behave exactly like posts. Some CPTs may work well with standard WP-Members settings in the Options tab whereas others may require special handling.)
コンテンツの制限
この設定より各投稿タイプのデフォルト設定が決まります。「制限」と「制限しない」のいずれかを設定します。投稿レベルを設定していない場合(投稿エディタの画面で設定できます)、指定された投稿タイプの投稿にはこの設定が既定設定として適用されます。 [投稿やページを制限する詳細については、コンテンツの管理を参照してください。]
原文を見る
This determines the default setting for each post type. Settings are “block” or “do not block”. As a default setting, any post of the identified post type will receive this handling if it does not have a specific setting at the post level (set in the post editor window). [See Managing Content for in-depth information on blocking posts and pages.]
抜粋を表示
この設定により、ユーザーがログインしていない場合、保護された投稿タイプでは自動抜粋や「続きを読む」タグの前に抜粋が表示されるようになります。これは単一の投稿ビューに適用されるものであり、アーカイブや検索結果のような投稿概要ページには影響しませんので注意してください。[コンテンツを管理 > 抜粋を表示を参照してください]
原文を見る
This will show any excerpt before the auto excerpt or “read more” tag on a protected post type when the user is not logged in. Note that this is specifically for the single post view and does not effect post summary pages such as archives or search results. [See Managing Content > Show Excerpts]
ログインフォームを表示 / 登録フォームを表示
既定では、このプラグインは制限されたコンテンツの代わりにログインフォームおよび登録フォームを表示します。これらを既定で表示するかどうかはこの2つの設定で投稿タイプごとに管理できます。インストール時の既定設定では、制限された投稿やページではコンテンツの代わりにログインフォームと登録フォームの両方が表示されます。
原文を見る
By default, the plugin will display a login and registration form in the place of blocked content. Whether these are displayed or not by default can be managed by post type with these two settings. The default setting at install will display both login and registration on blocked posts and pages instead of the content.
自動抜粋

この設定を使用すると、各投稿タイプの抜粋を自動的に定義できます。使用する場合、「続きを読む」タグを使用する必要はありませんが、タグを使用すると自動抜粋よりも定義された抜粋が優先されます。
この設定により、制限しなければならない既存コンテンツが既に存在するサイトの立ち上げと運用が簡単になります。 こうすることで全ての投稿を確認して「続きを読む」タグを設定する必要がなくなります。
自動抜粋の長さには、画像に関連付けられた HTML タグなど、ユーザーに表示されない可能性のあるコンテンツ内の追加コンテンツが含まれることに注意することが重要です。抜粋に画像が含まれる場合、全てのタグが単語数の一部としてカウントされます。これは大した問題ではありません。– 長さを設定する時に必ずこれを考慮すればいいだけです。
原文を見る
This setting allows you to automatically define an excerpt for each post type. When used, the use of the “read more” tag is not necessary, although if the tag is used, the excerpt will take a defined excerpt as a priority over the automatic one.
This setting makes it easy to get up and running, especially on a site that already has existing content to be blocked. This way you do not need to go through every post and set a “read more” tag.
It is important to note that the length of the Auto Excerpt INCLUDES any additional content in the content that might not show to a user, such as the HTML tags associated with images. If you have an image in the excerpt, all of the tags will be counted as part of the word count. It’s not a major deal – just make sure you account for this when setting the length.
新機能設定
これらは新しい設定であり、オプションとしてプラグインに組み込まれています。ほとんどの場合、それらは将来的にプラグインの新しい既定設定または公式設定になります。
現在のオプションについては、「新機能設定」を参照してください。
原文を見る
These are settings that are new and being worked into the plugin as options. Most often, they will become the plugin’s new defaults or official settings at a future date and time.
See “New Feature Settings” for current options.
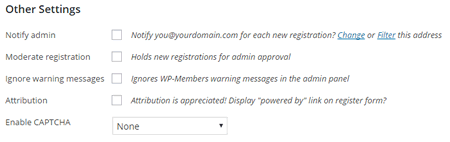
その他の設定
この設定項目では、管理者への新規登録の通知、管理者の承認 (モデレート登録) の設定、CAPTCHA の使用などの一般的な設定を制御します。
原文を見る
This section of settings handles some generic settings such as notifying the admin of new registrations, setting admin approval (moderated registration), and use of CAPTCHA.
メンバーシップを有効化
この設定により、「メンバーシッププロダクト」を作成するための特別なカスタム投稿タイプ (CPT) が有効になります。プロダクトは様々な目的に使用でき、必ずしも単一の構造に限定されるわけではありません。これらは、レベル、メンバーシップ グループ、単一ページ アクセスなどに使用できます。期限切れになる場合もあれば、期限切れにならない場合もあります。この設定を有効にすると、WP 管理者メニューに「メンバーシップ」メニュー項目が追加されます。 通常、このメニュー項目は「コメント」メニューの下に表示されます。
原文を見る
This setting enables a special custom post type (CPT) for creating “Membership Products.” Products can serve many purposes and are not necessarily limited to a single construct. They can be used for levels, membership groups, single-page access, etc. They can expire or not expire. When you enable this setting, it adds a “Membership” menu item in the WP Admin Menu. Generally, this menu item will appear below the Comments menu.
クローンメニュー
クローンメニュー設定を使用すると、このプラグインはユーザーのログインステータスに基づいて表示されるメニューを作成できます。テーマ内の任意のメニュー位置にクローンが作成されます。(注意:これはメニューではなくメニュー位置を複製します。)。
原文を見る
The Clone Menus setting allows the plugin to create menus that display based on a user’s login status. It will create a clone of any menu location in your theme. (NOTE: this clones the menu location, NOT the menu).
管理者への通知
これをオンにすると、管理者は新規登録に関する電子メール通知を受け取ります。これは承認登録が有効になっている場合に特に役立ちます。既定では、メールは 設定 > 一般 にあるブログに指定された管理者アドレスに送信されます。この通知を既定の管理者アドレス以外に送信する必要がある場合、または複数のアドレスに送信する必要がある場合は、wpmem_notify_addr フィルターを使用して変更できます。
原文を見る
When turned on, the admin will receive an email notification for any new registrations. This is especially helpful when Moderate Registration is turned on. By default, mail is sent to the admin address specified for the blog found under General > Settings. If that notification needs to be sent to someone other than the default admin address or needs to be sent to multiple addresses, that can be changed with the wpmem_notify_addr filter.
承認登録
サイトへのアクセスを許可する前に登録を手動で承認したい場合は、承認登録をオンにします。これをオンにすると、新しいユーザーはサイトへアクセスする前にサイト管理者によって承認される必要があります。ユーザーはユーザー詳細ページから個別に承認できます。WordPressの管理メニューの ユーザー > ユーザー一覧 、またはUsers > WP-Members™のプラグインの一括ユーザー管理画面からアクセスできます。 [詳細については、登録 > 登録の承認 を参照してください]
原文を見る
If you wish to approve a registration manually prior to allowing them access to the site, turn on Moderate Registration. With this turned on, any new users must be approved by a site admin prior to receiving access. Users can be approved individually via the user detail page. This can be accessed via WP’s admin menu Users > Users or the plugin’s bulk user management screen under Users > WP-Members™. [See Registration > Moderating Registration for more information]
確認用リンク
この機能は新規ユーザーの登録時にそのユーザーへ確認リンクを送信します。 ユーザーはアカウントを確認するまでサイトにアクセスすることはできません。
ユーザーがアカウントを確認しない場合、確認用リンクは 24 時間で期限切れになり、ユーザーは再度登録する必要があります。
重要: 既存ユーザーがいるサイトでこの機能を有効にすると、それらのユーザーは電子メールを確認済みとしては扱われません。ユーザー > ユーザー一覧の 画面で既存のユーザーの確認処理を手動で行うことができます。また全ての既存ユーザーを確認済みとして処理するために使用できるコードスニペットもあります。
重要: この機能は現時点では WooCommerce との互換性がありません。!!
原文を見る
This feature sends a new user a confirmation link when they register. They will not be allowed to access the site until they have confirmed their account.
If the user does not confirm the account, the link will expire in 24 hours and the user would have to register again.
IMPORTANT: If you activate this feature on a site with existing users, none of those users will have been marked as confirming their emails. You can confirm existing users manually in the Users > All Users screen, or there is a code snippet you can use to mark all existing users as confirmed.
IMPORTANT: This feature is not currently compatible with WooCommerce integrations!!
確認用リンクの追加設定
[wpmem_profile] を使用してユーザープロフィールページを設定し、プラグインのページ設定でページの場所を設定しなければなりません (後述する 固定ページ > ユーザープロフィールページ を参照してください)。これを設定しないと、電子メールに記述される確認リンクに完全なドメインパスが欠けてしまいます。
「古いログインエラー」は使用できません。 アクティベーションリンクオプションは、フォーム内の特定のメッセージ処理に WP ログインエラーオブジェクトを使用しています。そのためこの設定を有効にしてWP-Members ログインエラーを WPログインエラーに置き換える必要もあります。
ユーザーが登録時にパスワードを自分で作成できるようにプラグインを設定することをお勧めします。そうすればユーザーのパスワードを電子メールで送信する必要はありません。実際、アクティベーション リンクがプラグインの標準機能になれば、パスワード送信機能は最終的に廃止される予定です。登録時のパスワード作成を有効にするには、WP-Members のフィールドのタブでPassword の項目に (そして、できればConfirm Password の項目にも)チェックを入れてください。
原文を見る
You must have a user profile page set up with the [
wpmem_profile] shortcode and the location of the page set in the plugin’s page settings (See Pages > User Profile URL below). Without this, the confirmation link will lack the full domain path when added to the email.“Legacy Login Error” cannot be used. The activation link option uses the WP login error object for specific messaging in the form, so you need to also replace the WP-Members login error with the WP login error by enabling this additional setting.
It is recommended that you configure the plugin to allow users to create a password at registration. There is no need to send the user’s password via email. In fact, that capability will eventually be phased out as the Activation Link feature becomes standard in the plugin. To enable a password as part of registration, enable password (and, ideally, confirm password) in the WP-Members Fields tab.
警告メッセージを表示しない
WP-Members™ には、WardPressの管理画面に表示される多数の警告メッセージがあります。これらの一部は WardPress 設定の競合に関するものであり、その他はプラグイン固有のものです。この設定で警告メッセージをオフにできます。
原文を見る
WP-Members™ has a number of warning messages that it will display in the WP Admin Panel. Some of these are for WP settings conflicts and others are specific to the plugin. You can turn the warning messages off with this toggle.
帰属
この設定を有効にすることで登録フォームの最後に「powered by WP-Members」タグが表示されるようになります。WP-Membersは無料で利用できるプラグインであり、主にサポートサブスクリプションを購入したユーザーによって支えられています。プラグインを使用して便利だと思われた場合は、帰属リンクの追加をご検討よろしくお願いします。
原文を見る
This enables the display of a “powered by WP-Members” tag at the end of the registration form. This is a freely available plugin that is supported solely by users who purchase a support subscription. If you use the plugin and find it useful, please consider adding the attribution link.
登録時用の CAPTCHA を有効化
これをオンにすると登録プロセスに CAPTCHA が含まれるようになります。WP-Members™ ではreCAPTCHA バージョン1と2 、そしてReally Simple CAPTCHAをサポートしています。reCAPTCHAにはAPIキーが必要です。Really Simple CAPTCHA を使用するには、Really Simple CAPTCHAプラグインもインストールする必要があります。このプラグインは reCAPTCHA バージョン1 をサポートしていますが、バージョン1 の使用は Google によって非推奨になっており、ここでは互換性 (更新していないユーザー) のためにのみ維持されていることに注意してください。新規インストールではバージョン 2 のみを使用してください。[登録 > reCAPTCHAの使用を参照してください]
注意: CAPTCHA はログインフォームにおいて既定ではサポートされていません。wp-login.php フォームに CAPTCHA を追加するプラグインを使用している場合は、それに対処する必要があります。reCAPTCHA や Really Simple CAPTCHA をログインフォームに追加する場合は、wpmem_login_form_rowsフィルターを使用して追加し、wp_authenticate_userフィルターで認証できます (reCAPTCHA および Really Simple CAPTCHAを使った購読者コンテンツの例)。
原文を見る
Turning this on will include a CAPTCHA in the registration process. WP-Members™ supports reCAPTCHA version 1 and 2 as well as Really Simple CAPTCHA. reCAPTCHA requires an API key. Really Simple CAPTCHA requires that the Really Simple CAPTCHA plugin be installed as well. Please note that while the plugin supports reCAPTCHA version 1, its use has been deprecated by Google and it is only maintained here for legacy purposes (people who have not updated). New installations should only use version 2. [See Registration > Using reCAPTCHA]
Note: CAPTCHA is not supported by default on the login forms. If you use a plugin that adds a CAPTCHA to the wp-login.php form, you will need to address that. If you want to add reCAPTCHA or Really Simple CAPTCHA to the login form, that can be added in using the wpmem_login_form_rows filter and authenticated with the wp_authenticate_user filter (subscriber content examples for reCAPTCHA and Really Simple CAPTCHA).
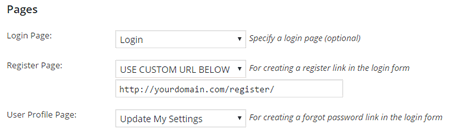
固定ページ
この項目ではオプションで設定できる特定のページについて説明します。これらは任意ですが推奨されるものです。これらの設定は単にページのアドレスを指定して適切なリンクを生成してるだけということに注意してください。これらの設定によってページが自動で作成されたり特定のショートコードが追加される訳ではありません。これを設定するかどうかはユーザー次第です。これにより希望どおりに設定でき、作成したページを使用するつもりのなかった内容で意図せず上書きしてしまうといった不快な可能性を回避できます。
3つの設定はそれぞれ、ドロップダウン選択を使用して同じように動作します。
- 既定では設定は選択されていません。
- このページのプラグインのショートコードを使用してページが設定されている場合は、ドロップダウンリストで選択できます。
- これらに何らかの外部処理が必要または望ましい場合は、ドロップダウンの選択肢から 「以下URL を使用してください」 を選択することでカスタム URL を特定できます (画像の例を参照)。
原文を見る
This section identifies certain specific pages that can optionally be set up. These are optional, although recommended. Keep in mind that these settings merely identify the location of the page so that the proper link can be generated. These settings DO NOT create the pages or add the specific shortcodes used. That is up to the user to set up so that you can have them configured the way that you want them and avoids the unpleasant possibility of overwriting something on a page you created that you did not intend to use for this purpose.
Each of the three settings operates the same way using a dropdown selection.
- No setting is selected by default.
- If a page is set up with the plugin’s shortcode for this page, it can be selected in the dropdown list.
- If some outside process is needed/desired for these, a custom URL can be identified by selecting “use custom URL below” from the dropdown selector (see image example).
ログインページ
ログイン ページの場所を指定します。基本的な運用ではこの設定は使用されませんが、特定の環境では必要になる場合があります (その場所は API 関数 wpmem_login_url() で取得できます)。 プラグインの拡張機能の一部、具体的には高度オプション拡張でこの設定を利用します。 [ショートコードのページを参照してください]
原文を見る
Identifies the location of a specific login page. The basic install does not make use of this setting, but it may be desired for certain customizations (its location can be retrieved with the API function wpmem_login_url()). Some of the plugin’s extensions utilize this setting, most specifically the Advanced Options extension. [See Page Shortcodes]
登録ページ
登録専用のページを設置します。このフィールドに登録ページの URL を指定すると、プラグインはメインコンテンツ領域とサイドバーウィジェットの両方のログインフォームに登録リンクを追加します。このページのアドレスは、API 関数 wpmem_register_url() を使用して取得できます。[ショートコードのページを参照してください]
原文を見る
Establishes a page specifically for registration. Specifying the URL of your optional Register Page in this field will cause the plugin to add a Register Link to the login form in both the main content area and the sidebar widget. The page location can be retrieved with the API function wpmem_register_url(). [See Page Shortcodes]
ユーザープロフィールページ
ユーザープロフィール領域とはフロントエンドのユーザーがパスワードと登録情報を更新できる場所です。パスワードを紛失した場合のリセット機能もこのページで維持されます。このフィールドにユーザープロフィールの URL を指定すると、プラグインはメインコンテンツ領域とサイドバーウィジェットの両方のログイン フォームに「パスワードを忘れた場合」リンクを追加します。このページのアドレスは、API 関数 wpmem_profile_url() を使用して取得できます。[ショートコードのページを参照してください]
原文を見る
The User Profile Area is where users on the front end can update their password and registration information. The Lost Password Reset feature is also maintained on this page. Specifying the URL of your optional User Profile in this field will cause the plugin to add a Forgot Password Link to the login form in both the main content area and the sidebar widget. Its location can be retrieved by the API function wpmem_profile_url(). [See Page Shortcodes]
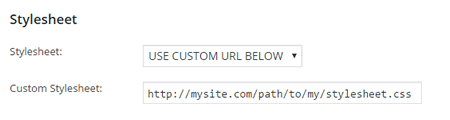
スタイルシート
WP-Members ではインストールされているスタイルシートから選択するためのドロップダウンメニューが用意されています。このドロップダウンメニューは、追加のスタイルシートを含めたい開発者や管理者向けに拡張可能です。
wpmem_admin_style_listフィルタを使用するとリストにスタイルシートを追加できます。
原文を見る
WP-Members offers a dropdown selector for choosing from the installed stylesheets. The dropdown selector is extensible for developers and admins that want to include additional stylesheets. The wpmem_admin_style_list filter allows you to add additional stylesheets to the list.
スタイルシートメニュー
このプラグインは現在の既定のスタイルシートが選択された状態でインストールされます。プリインストールされたスタイルシートを一覧の中から選択できます。
これらはあらかじめ作成されたものであり、現在あなたが使用しているテーマではうまく機能しない場合があることに注意してください。テーマと最適に統合させるにはカスタムスタイルシートを開発することを強くお勧めします。カスタムスタイルシートを使用する場合は、スタイルシートメニューで「以下のURLを使用してください」を選択してください。カスタムスタイルシートの入力欄が表示されてそのアドレスを指定できます。
wpmem_admin_style_listフィルターを使用して、追加のスタイルシートをドロップダウンメニューに追加できます。
原文を見る
The plugin will install with the current default stylesheet selected. You can select from the pre-installed stylesheets by choosing from the list.
Keep in mind, these are pre-made and may or may not work well with your current theme. In order to best integrate with your theme, it is highly recommended that you develop a custom stylesheet. If a custom stylesheet is used, you can identify its location by selecting “use custom URL below” in the stylesheet selector upon which the Custom Stylesheet input field will display.
Additional stylesheets can be added to the dropdown selector with the wpmem_admin_style_list filter.
カスタムスタイルシート
スタイルシートメニューで「以下のURLを使用してください」が選択されている場合、この入力欄が表示されます。スタイルシートのアドレスへのフルパスを入力します。ここに入力するパスはあらかじめブラウザでもテストしてください。ブラウザで直接参照したときに表示できない場合は、ページの読み込み時に読み込まれません。[詳細についてはフォームのカスタマイズを参照してください]
原文を見る
If “use custom URL below” is selected in the stylesheet selector, this field will display. Enter the FULL PATH to the location of your stylesheet. Test this path in your browser. If it cannot display when directly browsed to, it will not load when a page loads. [See Customizing Forms]
カスタム投稿タイプ
プラグインに対して カスタム投稿タイプを指定することで、カスタム投稿タイプを処理するようにプラグインを設定できます。これにより指定したカスタム投稿タイムがプラグインのメインのコンテンツ設定に追加されます。
全てのカスタム投稿タイプは異なっているということ注意してください。 – それらは本質的に「カスタム」であり、全てのカスタム投稿タイプ がWP-Membersが通常処理している投稿やページと同じように動作するわけではありません。そのためプラグインによって処理される投稿タイプ を選択しても、それが他と同じように閲覧制限されるとは限りません。どうなるかは指定されたカスタム投稿タイプに完全に依存します。カスタム投稿タイプが自動で設定に追加されないのはこのためです。指定されたカスタム投稿タイプがプラグインによって直接処理できるかどうかが我々には予測できないのです。
各カスタム投稿タイプにはWP-Members設定に追加するためのチェックボックス オプションがあります。選択した カスタム投稿タイプはメインのコンテンツ設定の設定に追加されます。 追加するカスタム投稿タイプを選択し、変更を保存してください。
原文を見る
The plugin can be configured to handle Custom Post Types by identifying the CPT to the plugin. This will add the CPT to the plugin’s main Content settings.
Keep in mind that every CPT is different – they are by nature “custom” and not all CPT will behave in a manner that allows WP-Members to handle it the same as a regular post or page. So selecting a CPT to be handled by the plugin does not guarantee that it will be blocked. It will depend entirely on the given CPT. It is for this reason that CPTs are not automatically added to the settings, since we cannot assume that a given CPT will be able to be handled directly by the plugin.
For each CPT, there will be a checkbox option to add it to the WP-Members settings. Any CPTs selected will be added to the settings for the main Content settings. Select the CPTs to add and save your changes.