これを使ってユーザーがログインするとログアウトリンクに変更されるメニュー項目を作成します。一般的にこれはユーザーがログインしていない時はログインページへのリンクを提供することを目的としています。
原文を見る
This creates a menu item that will change to a logout link when the user is logged in. Generally, this is intended to provide a link to the login page when the user is not logged in.
https://rocketgeek.com/plugins/wp-members/docs/menus/login-logout-menu-link/
セットアップ
ログインページへリンクするメニュー項目を作成します。
WordPress 管理パネルで、[外観 > メニュー] に移動します。いつもと同じようにメニュー項目を追加します。既にログインページを作成している場合はそのページを指定して [メニューに追加] をクリックします。
ページのラベルはこれが動作する上でそれほど重要ではありませんが、おそらく「ログイン」などの直感的に動作がすぐ分かるものにしたいと思うでしょう。ただし、重要なのはメニュー項目に指定される CSS クラスです。これはプラグインで使用されるスクリプトと一致する必要があるためです。
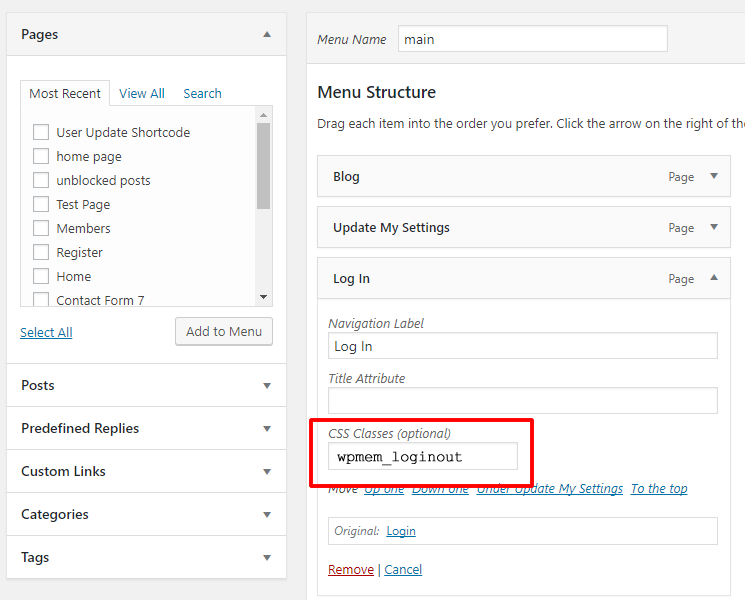
CSS クラスを追加するには、メニュー項目を開き「CSS クラス」見出しの下に「wpmem_loginout」と入力します(スクリーンショットを参照)。
必ず「メニューを保存」をクリックして変更を保存してください。
Note: CSS クラスがメニュー オプションに表示されない場合は、画面設定で CSS クラスを有効にする必要があります。画面の右上隅にある「表示オプション」プルダウンメニューを見てください。それを開き、「詳細メニュー設定を表示」で「CSS クラス」がチェックされていることを確認します。
原文を見る
Create your menu item for linking to the login page.
In the WP Admin panel, go to Appearance > Menus. Add a menu item like you normally would. If you already have a login page created, locate your page and click “Add to Menu”.
The label for your page is not critically important for this to work, but you probably want to make it something intuitive such as “Log In”. The part that is critical, however, is the CSS class given to the menu item because it needs to match the script used in the plugin.
To add the CSS class, open the menu item and under the “CSS Classes” heading, insert “wpmem_loginout” (see screenshot).
Be sure to click “Save Menu” to save your changes.
Note: if CSS Classes are not displayed in your menu options, then you need to enable them in the screen settings. Look to the upper right corner of the screen and locate the “Screen Options” pull down menu. Open that and under “Show advanced menu properties” make sure “CSS Classes” is checked.
https://rocketgeek.com/plugins/wp-members/docs/menus/login-logout-menu-link/