この設定画面では、登録フォームに表示される項目とそれらのうちのどれを必須項目にするかを管理者が設定できます。
登録フォームに表示したい項目の「登録」にチェックを入れます。表示するように選択されていない項目は管理者のみが使用します。
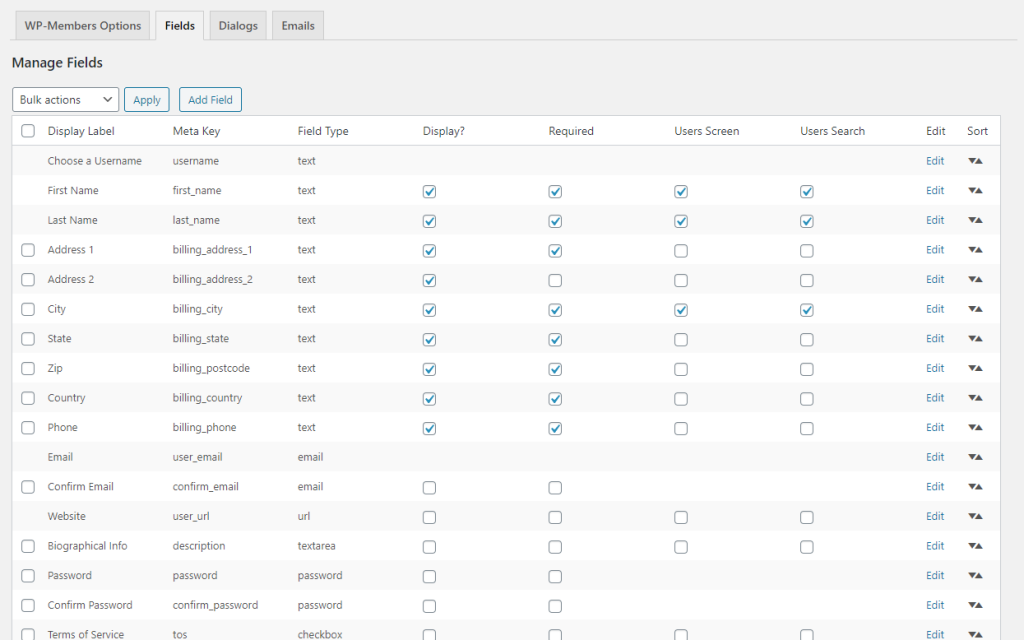
この項目への入力が必須かどうかについては「必須」にチェックを入れてください。
この画面での変更を保存するには、フィールド テーブルの左上または左下にある「一括操作」メニューから「設定を保存」を選択します。それから「適用」ボタンをクリックします。(この一括操作ボタンはフィールド管理テーブルを生成するのに使われるWardPressリストテーブルのコンポーネントです。WardPressの他の管理画面でも使用されているので、見覚えがあるでしょう。)
フィールドはプラグインのインストール時に WardPressオプション テーブルの配列に読み込まれます。 [フィールドの追加/削除およびフィールドの順序の変更方法については、フィールドの選択を参照してください。]
以下のフィールドはインストール時にプラグインに読み込まれます:
- Username (meta_key:user_login, WardPressネイティブのフィールド)
- First Name (meta_key: first_name, WardPressネイティブのフィールド)
- Last Name (meta_key: last_name, WardPressネイティブのフィールド)
- Address 1 (meta_key: billing_address_1, WooCommerce ネイティブのbilling フィールドに該当)
- Address 2 (meta_key: billing_address_2, WooCommerce ネイティブのbilling フィールドに該当)
- City (meta_key: billing_city, WooCommerce ネイティブのbilling フィールドに該当)
- State (meta_key: billing_state, WooCommerce ネイティブのbilling フィールドに該当)
- Zip (meta_key: billing_postcode, WooCommerce ネイティブのbilling フィールドに該当)
- Country (meta_key: billing_country, WooCommerce ネイティブのbilling フィールドに該当)
- Day Phone (meta_key: billing_phone, WooCommerce ネイティブのbilling フィールドに該当)
- Email (wp_users field: user_email, WardPressネイティブのフィールド)
- Confirm Email (保存されません)
- Web site (wp_users field: user_url, WardPressネイティブのフィールド)
- Biographical Info (meta_key: description, WardPressネイティブのフィールド)
- Password (wp_users field: user_pass, WardPressネイティブのフィールド, ハッシュ値で保存)
- Confirm Password (保存されません)
- TOS (meta_key: tos, 保存される値: “agree”)
Email を除き、これらのフィールドはいずれも必須ではありません。「登録」を選択すると登録に使用するフィールドを選択できます。表示するように選択されていないフィールドは管理者のみが使用します。どのフィールドも必須フィールドとして選択できます。
いくつかのフィールドはWooCommerce ネイティブのフィールドに該当するものとして表記されていることに注意してください。これはWP-Members と WooCommerce の両方を統合しているユーザーがたくさんいるので便宜上そう表記しているだけです。 WP-Members を使用するのに WooCommerce は全く必要ありません。これらを初期フィールドとして作成しているのは単に初期設定を簡単にするためです。 これらのフィールドを保持する必要はありません (フィールドの削除/削除については以下を参照してください)。
フィールドの順序はドラッグアンドドロップで変更できます。 移動したいフィールドを選択し、テーブルの順序内の新しい位置にドラッグするだけです。
使用されていないフィールドは削除することができます。また[フィールドの追加] フォームを使用して必要なカスタムフィールドを追加することもできます。WardPressネイティブのフィールドを除き、既存のフィールドは編集可能です。編集可能なフィールドには最後の列に編集リンクが表示されます。
WP Native Fields indicates which fields are part of WordPress® and are therefore already part of the User Detail Page. 非ネイティブフィールドのデータは、ユーザー プロフィール ページの下部の「WP-Members Additional Fields」という見出しの下にあります。
「ユーザー画面」を選択すると、ユーザー画面 (ユーザー > ユーザー一覧)にフィールドの列が追加されます。
「ユーザー検索」を選択すると、ユーザー画面(ユーザー > ユーザー一覧)でユーザーを検索する時に検索されるフィールドにフィールドが追加されます。既定では、WordPress はユーザー画面でユーザーを検索するときにユーザー名とメールアドレスのみを検索します。より関連性の高い検索結果が必要な場合は、検索対象のフィールドを追加する必要があります。ただし検索対象に追加するフィールドが多すぎると検索結果の関連性が低くなりますのでご注意ください。
フォームフィールドでサポートされているフィールドタイプは以下の通りです。:
- text
- textarea
- checkbox
- multiple checkbox
- select
- select multiple
- radio
- password
- image
- file
- url
- hidden
- number
- date (日付は全てのブラウザで完全にサポートされている HTML 入力タイプではないので注意してください。)
原文を見る
This settings screen allows the administrator to establish what fields are displayed in the registration form and which fields are required.
Check “Display” for which fields you want displayed in the registration form. Any fields not selected to display are admin use only.
Check “Required” for whether entering data for this field is required or not.
To save any changes on this screen, select “Save Settings” from the “Bulk Actions” menu at the upper left or lower left of the fields table. Then click the “Apply” button. (The bulk action menu is a component of the WP list table used to generate the field manager table, so it should be familiar as it is used elsewhere in the WP admin.)
Fields loaded into an array in the WP Options table at plugin install. [See Choosing Fields for information on how add/delete fields and change the field order]
The following fields load into the plugin at install:
- Username (meta_key:user_login, WP native field)
- First Name (meta_key: first_name, WP native field)
- Last Name (meta_key: last_name, WP native field)
- Address 1 (meta_key: billing_address_1, matches default WooCommerce native billing field)
- Address 2 (meta_key: billing_address_2, matches default WooCommerce native billing field)
- City (meta_key: billing_city, matches default WooCommerce native billing field)
- State (meta_key: billing_state, matches default WooCommerce native billing field)
- Zip (meta_key: billing_postcode, matches default WooCommerce native billing field)
- Country (meta_key: billing_country, matches default WooCommerce native billing field)
- Day Phone (meta_key: billing_phone, matches default WooCommerce native billing field)
- Email (wp_users field: user_email, WP native field)
- Confirm Email (not stored)
- Web site (wp_users field: user_url, WP native field)
- Biographical Info (meta_key: description, WP native field)
- Password (wp_users field: user_pass, WP native field, hashed)
- Confirm Password (not stored)
- TOS (meta_key: tos, stored value: “agree”)
None of these fields are mandatory except for Email. You may select which fields are used for registration by selecting “Display”. Any fields not selected to display are admin use only. Any field may be selected as a required field.
Note that some fields are noted as matching WooCommerce native fields. This is ONLY because there are a lot of users who integrate both WP-Members AND WooCommerce together. You do not need WooCommerce to use WP-Members at all. Creating these as initial field meta is simply to make initial integration easier. You do not need to keep these fields (see below regarding removing/deleting fields).
Field order can be changed by drag-and-drop. Simply select the field you want to move and drag it a new location in the table order.
You may remove/delete any fields that are not used. You may add any custom fields you want by using the Add Field form. Existing fields can be edited, with the exception of WP native fields. Any field that is editable will have an edit link in the last column.
WP Native Fields indicates which fields are part of WordPress® and are therefore already part of the User Detail Page. The data for any non-native fields will be found at the bottom of the user profile page under the heading “WP-Members Additional Fields”
Selecting “User Screen” will add a column for the field in the User Screen (Users > All Users).
Selecting “Users Search” adds the field to fields searched when searching users on the User Screen (Users > All Users). By default, WordPress only searches username and email address when searching users on the User Screen. If you want/need more relevant search results, you need to add fields to be searched. Note however that adding too many fields to the search will make your search results less relevant.
Supported field types for form fields are:
- text
- textarea
- checkbox
- multiple checkbox
- select
- select multiple
- radio
- password
- image
- file
- url
- hidden
- number
- date (Note that date is not a fully supported HTML input type in all browsers)